Inserting Zippers With Your Serger: Easy Clutch Tutorial

Sergers are meant to make your life easier. Today's tutorial is going to show that and more! I really wanted to give you a call to action during the Love Your Serger series that will help gain skills and build confidence. These zipper clutch bags require only 2 materials and are so useful. Did I mention they can be made in 10 minutes or less!?

You'll need:
(1) Placemat
(1) 22'' Polyester Zipper
Yep that's it! I promised it was easy. The placemat works well for repurposing in this project because they can be easily found (at thrift stores for a dollar or less or in stores for a little more) and are interfaced to offer support. We're going to be focusing on the 4 thread overlock stitch. It is the most secure stitch and one of the most used on a home overlocker.

1. Lay out the placemat right side up. Align your zipper along side the short side edge of placemat.
NOTE: The zipper we are using is much bigger than the length of the placemat. This is intentional. We want the largest zipper you can find because later in tutorial we're actually going to use our sergers to cut/overlock the zipper ends into the clutch bag. The serger blade will cut through your polyester zipper with ease- using the longer zipper ensures we are cutting through only the zipper teeth and tape- keeping any metal parts far away from the blade. When placing the zipper on the bag in the first step make sure you have 2-3'' of zipper overhang on either end. Use clover clips to hold in place if you need to.

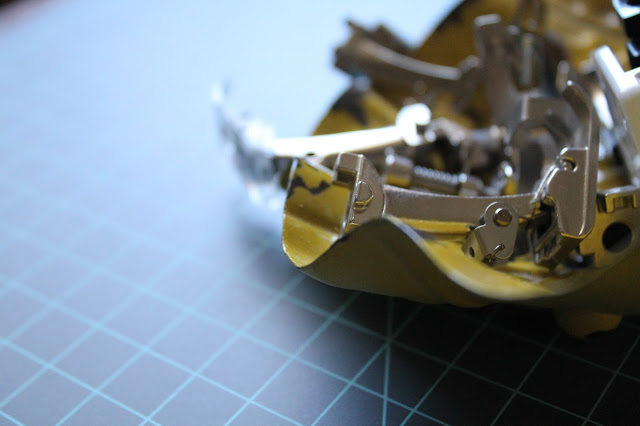
2. Make sure your machine is set properly to create a 4 Thread Overlock stitch. Understanding how the stitch forms on your machine will be a great benefit read; How Your Serger Actually Works. With your presser foot in the upright position, situate the placemat and zipper 1/2'' away from the needle. We will begin stitching on the zipper overhang first and gradually onto the placemat. You do not need to worry about securing the beginning stitch here or on the end- they will both be enclosed in the final seams of the bag.
Tip: As you come to the end of your fabric continue stitching. You should always have about a 6" to 8" chain tail of stitches from the backside of your machine.

NOTE: When serging I am watching the knife, keeping the edge of my zipper tape and mat in line with it so that it rides along side shaving just a smidge of fabric as it goes. While serging zippers into bags I also want the edge of my presser foot to ride directly on top of the zipper teeth. You can use either of these as a guide for you, or both.

3. Fold the other short end of place mat up matching right sides together with zipper. Repeat step 2 using 4 thread overlock stitch.

4. Now you've created a tube. Keeping the pretty inside the tube- situate your placemat so that the zipper is 3'' from top edge. Use clover clips to match sides. Remember to move your zipper pull to the middle otherwise, you will serge your bag closed with no way of opening. I cut 1/2'' from the edge of fabric, because the bulk in seams of this placemat. To do this I line my bag up on the front feed dog and allow it to pull the fabric through. You can run your serger without having the needles penetrate directly onto any materials.
NOTE: Anytime I am inserting zippers with my overlocker I serge so that I'm able to see the zipper. This allows me to visually see the approach of the nylon or poly zipper teeth as they make their way to the cutting edge of the knife. Be sure to keep a steady and consistent speed as you are cutting through your zipper.
5. Repeat step 4 on last edge. Use a fray check type product or tuck thread tails on all 4 corners. Turn right side out. And you're finished! Hooray! You can create a beautiful and unique clutch bag or zipper pouch in 10 minutes or less!

2. Make sure your machine is set properly to create a 4 Thread Overlock stitch. Understanding how the stitch forms on your machine will be a great benefit read; How Your Serger Actually Works. With your presser foot in the upright position, situate the placemat and zipper 1/2'' away from the needle. We will begin stitching on the zipper overhang first and gradually onto the placemat. You do not need to worry about securing the beginning stitch here or on the end- they will both be enclosed in the final seams of the bag.
Tip: As you come to the end of your fabric continue stitching. You should always have about a 6" to 8" chain tail of stitches from the backside of your machine.

NOTE: When serging I am watching the knife, keeping the edge of my zipper tape and mat in line with it so that it rides along side shaving just a smidge of fabric as it goes. While serging zippers into bags I also want the edge of my presser foot to ride directly on top of the zipper teeth. You can use either of these as a guide for you, or both.


4. Now you've created a tube. Keeping the pretty inside the tube- situate your placemat so that the zipper is 3'' from top edge. Use clover clips to match sides. Remember to move your zipper pull to the middle otherwise, you will serge your bag closed with no way of opening. I cut 1/2'' from the edge of fabric, because the bulk in seams of this placemat. To do this I line my bag up on the front feed dog and allow it to pull the fabric through. You can run your serger without having the needles penetrate directly onto any materials.
NOTE: Anytime I am inserting zippers with my overlocker I serge so that I'm able to see the zipper. This allows me to visually see the approach of the nylon or poly zipper teeth as they make their way to the cutting edge of the knife. Be sure to keep a steady and consistent speed as you are cutting through your zipper.
5. Repeat step 4 on last edge. Use a fray check type product or tuck thread tails on all 4 corners. Turn right side out. And you're finished! Hooray! You can create a beautiful and unique clutch bag or zipper pouch in 10 minutes or less!


Comments
Post a Comment